This KB teaches the complete workflow of Odoo eCommerce based on the official Odoo tutorials and documentation: creating products & variants, organizing catalogs, pricing, cart & checkout, shipping & payment, customer accounts/portals, order management, sales strategies, as well as loyalty & e-wallet. It is written for business users who need a practical and clear guide to ensure their online store operates efficiently.
1. Overview
Odoo eCommerce allows you to design store pages, publish products, manage the cart & checkout, receive online payments, connect shipping, and monitor orders integrated with Sales, Inventory, and Accounting. A unified platform reduces manual work and provides real-time visibility from the website to shipping.
2. Key Features
- Drag-and-drop page builder for product pages & checkout steps.
- Product templates & Variants (attributes/values).
- Catalog with categories, filters, and sorting.
- Pricelist for flexible pricing policies.
- Configurable Cart & Checkout.
- Built-in Payment Provider & Shipping.
- Customer Account/Portal to view quotes, orders, invoices, etc.
- Order Management connected to warehouse fulfillment.
- Sales Strategies: cross-sell/upsell, alternatives, accessories.
- Discounts, Loyalty & e-Wallet for retention.
Step-by-Step Guides
3.1 Create Product
Create & publish products via Website and Product Template editor.
Steps:
- Sales → Products → Products → New. Fill in Name, Product Type, Sales Price, Invoicing/Inventory.
- Open the smart button Website → enable Published.
- Click Edit on the website for block customization (images, specifications). Tips: Use high-quality images & concise specifications; optimize SEO title/meta.
Example: Add “T-Shirt” with default color and available stock.
3.2 Product Variants
Manage product options (size, color) through Attributes & Variants.
Steps:
- Sales → Configuration → Attributes → New (e.g., Size, values S/M/L).
- On the product, Attributes & Variants tab → add Attribute → Generate Variants.
- Optionally set images/prices per variant.
Tips: The order of attributes affects the display in the configurator & eCommerce page.
Example: T-shirt with Color (Black/White) & Size (S-XL).

3.3 Product Variants
Manage product options (size, color) through Attributes & Variants.
Steps:
- Website → Shop → use the Categories/Attributes filter.
- Set the Website Product Category on the product; create a hierarchy if necessary.
- Use the Website editor to arrange the layout (grid/list) & sidebar.
Tips: Create concise & clear categories; display attribute filters.

3.4 Pricing (Pricelists)
Set up Pricelist to vary prices based on customers, regions, currencies, or periods.
Steps:
- Website/Sales Settings → enable Pricelists.
- Sales → Products → Pricelists → New; add rules (fixed price, discounts, formulas).
- Assign to customers/segments or allow switching pricelist on the website.
Tips: Use date-based rules for promotions; multi-currency for cross-border.

3.5 Cart & Checkout
Configure the order button and checkout sequence (address → shipping → payment → confirmation).
Steps:
- Website → Configuration → Settings → Shop / Checkout: choose guest/optional/mandatory login, enable additional steps.
- Customize text/images per step via the website editor.
- Test: add to cart, go through steps, confirm order.
Tips: Minimize friction; explain shipping/payment options from the start.

3.6 Shipping & Payment Providers
Activate the courier and payment gateway so that customers can choose shipping and pay online.
Step (Payment):
Website → Configuration → Payment Providers → Activate & konfigurasi
metode (kartu, e-wallet).
Step (Shipping):
Website → Configuration → Delivery Methods.Activate the delivery method and connect it to the carrier; display options at checkout.

Tip: In Indonesia, many teams integrate Xendit (cards, e-wallets, paylater) through payment providers.
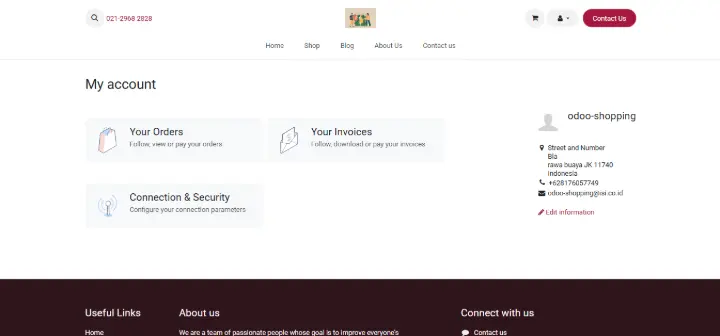
3.7 Customer Portal & Account
Customer accounts allow login to view documents (quotation, order, invoice). You can make login mandatory at checkout if needed.
Steps:
- Website → Configuration → Settings → Customer Accounts options (guest/optional/mandatory).
- Grant portal access from Contacts by adding Portal rights (sending invitations).
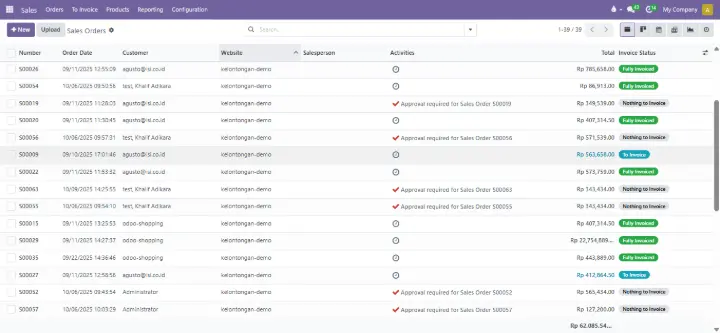
3.8 Order Management
Monitor orders from confirmation to delivery; review unpaid orders and abandoned carts; align with Inventory for fulfillment.
Steps:
- Website/Sales → Orders to view Orders, Unpaid, Abandoned Carts, Customers.
- Use status and chatter for communication & record-keeping.
Tip: Align eCommerce status with warehouse flow for transparency.
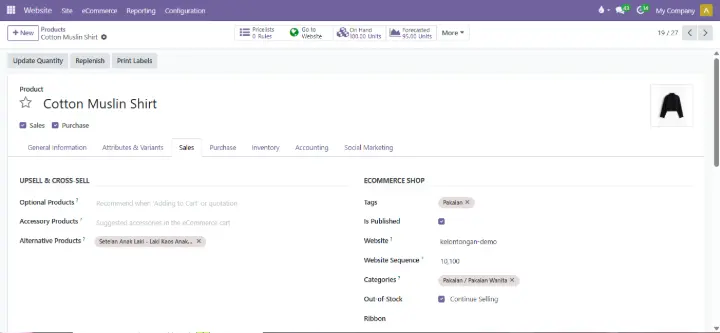
3.9 Selling Strategies
Increase AOV with cross-sell, upsell, alternatives, and product accessories.
Step:
Open product → Sales tab → set Accessory Products, Alternative Products, and upsell options.
Tip: Pair accessories that address common objections (e.g., charger for laptop).
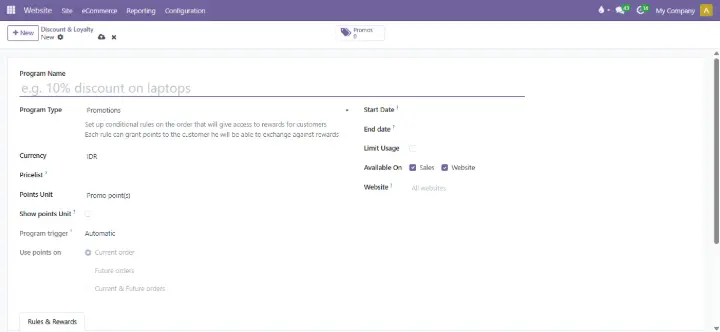
3.10 Loyalty Programs & E-Wallets
Offer rewards points, gift cards, and e-wallet balances that can be used online (eCommerce/Portal) as well as in stores (PoS).
Step:
- Sales Settings → enable Discounts, Loyalty & Gift Cards.
- Sales → Products → Discount & Loyalty for rules (earn/redeem).
- Gift Cards & eWallets for prepaid/saved value.
Tips: Start with simple point rules, then add tiers or birthday bonuses.
4. Common Use Cases
- Products can be configured: Fashion with color/size variants; display attribute filters in Shop.
- Region-based pricing: Pricelist per country/currency; allow visitors to switch pricelists.
- Xendit Payment (Indonesia): Add Xendit via Payment Providers for cards, e-wallets, and paylater.
- B2B ordering with portal: Require login at checkout; customers track orders/invoices in My Account.
- Abandoned cart recovery: Review Abandoned Carts and follow up via email/CRM.
5. Troubleshooting & FAQs
Produk tidak tampil online?
- Pastikan Published aktif dan produk punya kategori Website. Cek stok/aturan ketersediaan.
Checkout tiba-tiba wajib login?
- Tinjau pengaturan Customer Accounts (guest/opsional/wajib).
Metode pembayaran tidak muncul?
- Provider harus Activated dan dikonfigurasi di Website → Payment Providers; pastikan mata uang sesuai.
Tidak bisa mengubah teks checkout?
- Gunakan editor Website; tiap langkah mendukung kustom konten.
Masalah penyortiran/katalog?
- Cek ulang kategori dan filter atribut; sederhanakan hierarki agar navigasi mudah.
6. Related Modules
- Sales: core products/pricelist, quotation & order.
- Inventory: stock, routes, delivery orders.
- Accounting: invoice, payments, reconciliation.
- Website: page builder, SEO, blog/marketing tools.
7. Pro Tips
- Simplify. Reduce checkout friction; display shipping costs upfront.
- Price segmentation. Use Pricelist for B2B vs B2C or regional policies.
- Facilitate search. Keep categories intuitive and enable attribute filters.
- Increase AOV. Set up cross-sell/upsell per product.
- Loyalty. Start with simple points; add tiers later.